Happy New Year! Its almost 2013 but lets make your New Year sparkle by making homemade new year glasses! This is an exciting and easy project to do and it also saves some money! Well, what are you waiting for? Lets get started! All you need is a few materials:
Pair of sunglasses
Drawing paper
Pencil
Scissors
Poster paper
Decorations (Glitter, stickers, e.t.c.)
First, take the sunglasses and keep one of the earpieces on the paper and trace it. Next, tilt it so the front lens is on the paper and trace it. In addition, tilt it again so the other earpiece is down on the paper and trace that too. Now, there should be an outline of the sunglasses on the paper that is connected. Furthermore, draw any shape (circle, star, heart, e.t.c.) in the middle of the trace which would be where your eye goes. Make sure to do two of them make it big enough for your eye to fit in. More importantly, write the number of the new year in bubble letters on the glasses. After you have done that, you can draw some decorations on it like streamers going through the numbers. Just use your imagination for the decorations. Now, you can cut the whole piece out. Make sure to try them on to see if it fits and your eye can see through the hole. In addition, trace the whole piece on poster paper and cut it out. In summation, you can decorate it with things like glitter or stickers! You can decorate it however you want but remember to use your imagination! Once again, Happy New Year andHAVE FUN!
Happy Holidays! There is only a few more days until Christmas so why not add a new ornament to the tree? Today we will make an exciting christmas ornament of an angel! Let's get started! All you need is a few materials:
COFFEE FILTER
Three coffee filters
Two cotton balls
A 6-8 inch piece of ribbon (thin)
One white chenille stem
One gold chenille stem
Scissors
Hot glue gun
Now we are ready to start! First, take one of the coffee filters and place two cotton balls in the middle. Next, hold the coffee filter in your fingers and squeeze it so that the cotton balls are in the center and a circle forms in the top. The top part will be the angels head. In addition, take another coffee filter and tuck it in from the open side. This will give the effect of a dress. Furthermore, tie a small piece of ribbon around the "neck" or where the face extends to the dress. More importantly, take the last coffee filter and fold it in half. Then, fold it lengthwise to make creases. (accordian style) Take your white chenille stem and wrap it around the middle. Stretch them out slowly to make them bigger. These are going to be its wings. Below, is how it should look.
Now we are going to make the halo from the gold chenille stem. You need to wrap it around the head and twist the ends together. Since the chenille stem is so long, cut the remaining piece so there is about three inches remaining. Next, hot glue the remaining three inch piece with the halo on the back of the head. Make sure it is on the top of its head and not somewhere else. In summation, hot glue the wings in the back so it hides the gold chenille going from the halo. This is how it should look when it is finished! Have fun!
Hey guys! There is just a few more days until winter but it hasn't even snowed yet over here! Well lets get in the wintry mood and make it snow inside your home! Today we are going to learn how to make a huge snowflake!. It's not just an ordinary snowflake that you cut out. This is extraordinary! All you need is a few materials:
Six sheets of paper (9x12)
Scissor
Stapler
Tape
Pencil
Now we are ready to start! First, you need take the top right hand corner and bring it down to make it align with the left hand corner. It is going to make the paper into a square shape instead of a rectangle. Once you are done, it will look like a triangle and please don't open it up. This step is almost like when you make a fortune teller and make the paper into a square. You need to do it with all six pieces of paper.
Furthermore, take one of the pieces of paper and fold it into a smaller triangle. Basically, just fold it in half. Please do this with all pieces of papers. Next, hold the paper so it is a right angle on the left side. With a pencil, draw a line about half an inch apart from the area where there is no right angle. Make sure it is going diagonal. Stop about 1/4 of an inch away from the tip. Keep on making lines but make each one shorter and shorter as they go. In total, there should be three lines on each paper.
In addition, you need to cut on each of these lines. After you have done that, open one up. Take the small cuts that are in the middle and fold both of them inwards and then tape them together. Next, turn your paper around and do the same with the next cuts. Keep doing this with all of the cuts but make sure that you do each cut a different side so when you tape one, turn the paper over and do with the next one, and then turn the paper over again. Do this to all six papers.
In summation, we need to staple these together to make one large snowflake. Take all of the six papers and hold them together in one hand so all of them are facing down. Staple it where you hand is or the part where all papers meet. Next, staple each two papers and staple it together where both of the tape parts meet. Do this with each one so it stays keep.
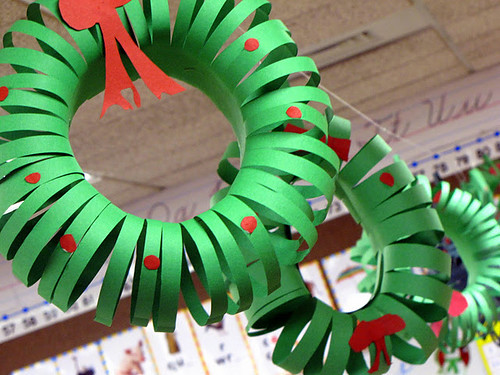
Hey guys! I'm back! It's finally December and the holidays are almost here! Today we are going to get in the holiday mood and learn how to make a beautiful paper wreath! You can hang this anywhere like your front door or window! All you need is a few materials:
A 9x18 sheet of green construction paper
scissors
ruler
stapler
pencil
Paper of any size or color for decorations on the wreath
Now we are ready to start! First of all, you need to fold the green paper in half hot dog style. Once you have done that, you need to go to the long side of the paper where the crease or fold is NOT there. Take the ruler and mark 1-2 inches to the left with the pencil. Make a line going vertically down the long side. This line will be the "no cutting zone" on another step. In addition, on the line you made, make tic marks after every half an inch. Also, do the same on the crease. Next, draw a straight line connecting each tic mark. Now, on the lines you just made, cut on top of it but don't cut past the "no cutting zone" which I said earlier.
When you are done cutting, it should look like this. Furthermore, you have to open it up and put both ends together so it almost looks like a tube. More importantly, to keep this together, you need to staple it. You can staple it one from the bottom, one on the top and two in between. Now, your tube would stay straight.
In addition, to make it easier later on, you can kind of crease the side where the cut stops like this.
Next, you have to staple both ends together so it almost looks like a wreath or a circle. In summation, you can draw and cut bows and berries from the other paper you had. After, you can staple them on. Have fun making your wreath and Happy Holidays!
I'm back! Today we are going to learn how to make a texture canvas! In a textured canvas you are making a creative abstract painting with a hint of something unique. When you touch it, you can have all different kinds of textures like rough or soft! All you need is a few materials:
Molding Paste
A plastic cup
A plastic knife
Fork
Small things shaped as a circle
Canvas (any size)
Paint and paintbrush
Above is the best brand for molding paste. You can get it at any craft store like Micheal's or AC Moore.
Now we are ready to start! First, take your canvas and open the molding paste. Take the plastic knife and spread it on the whole canvas but not the borders on the side. Make sure it is smooth. Do not make it bumpy or add any design. Before it dries, you can create designs on top of the paste. You can take the fork and create a squiggly line across the canvas going horizontal. In addition, you can take the end of the cup and press it down on top of the squiggly line. Under the line, you can just dot it with the bottom of the fork to make a beautiful design. You can also take other materials and create any design of your imagination.
It takes about 24 hours for the paste to dry. After it dries, take a color of paint and paint the borders of the canvas with any color of your choice. Next, paint on top of the paste. You can color the negitive space (outside) one color and the circles another color. Make sure to keep it colorful and neat. Try to color it based on each material. For example, you can color the things with the fork, blue and the things with the cup, yellow. Once that is dry, you are finally done! Have fun making your textured canvas!
Hey guys! Happy Thanksgiving! Today, lets take a small break from art and focus on the Macy's Thanksgiving Day Parade! The first parade started in 1924 but it will once again come every year. Well, when do people have all this time to get the parade ready and to make sure that everything is perfect? Well, lets find out! Two days before Thanksgiving is full of activity. Its one of the most hectic time of the year for them. They have to take 25 floats, 44 balloons, and dozens of push floats to go through the Lincoln Tunnel from the Hoboken Studio the day before Thanksgiving. From the famous singers to Broadway shows. They also have to close the road in New York so they can make room for the parade.
Now lets talk about the balloon inflation and deflation. Inflating and deflating the balloons are also really hard and time consuming. To inflate a balloon, it takes about one hour and a half to about two hours. They have to do to it really early in the morning on Thanksgiving day before the parade. Plus, since the balloons are so gigantic, they can't even see what it is until it gets really big which takes a long time! Deflating the balloon takes double the time because they have to pack them up nicely so they can use it for next year. They also have to bring it all the way back to the Hoboken Studio.
Do you have any old crayons that you don't use anymore? Well, instead of throwing them out, there is a way you can recycle them! You can make beautiful candles out of them! All you need is a few materials:
Container (About 2-3 inches tall and microwave safe)
About 10-15 old crayons of one color
microwave
toothpick
Now we are ready to start! First, you need to rip the wrappers off the crayon. Make sure the color of the crayon you chose is a colorful color. Do not use any black or brown. One you have done that, drop the crayons into the container. If some don't fit, just break the crayons in half. Furthermore, take your container and put it in your microwave for about two minutes. After you take it out, the crayons you put in the container should be melted. Keep the container out and don't touch touch it for about five minutes because the wax needs to rest a little bit.
Now we have to put the wick in the melted crayon mixture. You have to use the correct wick size in order to have your candle work properly. It should be about a half an inch taller than the container. First, take a toothpick and poke a hole in the middle of the mixture. Make sure it is big enough for the wick to fit in. Once you are done with that, you can put the wick in. After it is in, you should see about a half of an inch out so you can light it up. If it is more, just cut it so it is the right size. If it is less, you need to put another wick in. In summation, let it rest for five minutes and then you are done! Have fun making candles!


;)