Everyone loves gradients! Especially when it is glittery too! Today we are going to learn how to make glitter gradient nails! It is really easy and looks magnificent!
 You will need:
- OPI-Sweetheart
- Orly-Tiara
- Revlon-Sparkling
- Fast drying top coat
First, paint two layers of OPI-Sweetheart on your nails. After that dries, take the Orly-Tiara and start from the top. Be careful not to put chunks of glitter on your nail first. Try the finest pieces of glitter. As you move your brush down your nail, try using less and less glitter as you go to make a gradient effect. Leave at least 1/4 of your nail with no glitter.
Now start to use the chunkier glitter. Take the Revlon-Sparkling and take just a little bit of glitter on your brush. Furthermore, just paint a second coat of glitter. Try to add most of the glitter on the tippy-top of your nail. In summation, apply a fast drying top coat and you're done!
HAPPY POLISHING!
The Intrepid was a battleship used in World War II. On April 27, 1981, the ship became a sea, air, and space museum located on the Hudson River in New York.
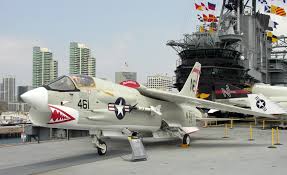 One of the many aircraft's on the Flight Deck at the Intrepid is Vought F-8K Crusader. This aircraft was the first supersonic fighter designed for carrier use. On March 25, 1955, it became the first single-seat aircraft to break the sound barrier on its maiden flight. It was the fastest aircraft with speeds of 1,322 mph that can go 52,350 feet. The Vought F-8K Crusader was used extensively in the Vietnam War. It has been on the ship for a long time, around 37 years from when it retired.
 The Berthing Deck was where all the soldiers slept and kept all their personal items. They slept on bunks with thin mattresses in small rooms and used a three man locker to keep personal items. Over 3,000 sailors, officers, and Marines lived on the Intrepid so of course this deck was a "must have." Soldiers could keep photographs, letters, and other hygienic items in the three man locker.
 Our class just had a field trip to the Intrepid and we learned many things. We learned that the Intrepid was used in World War II. This is important because World War II was a big part in our history. People should know this because many people who didn't go on the Intrepid, wouldn't be alive right now. We also learned that the Intrepid was home to many soldiers during World War II. This is important because those soldiers helped fight freedom from other countries. People should know this because some soldiers wouldn't have a home if it wasn't for the Intrepid. Finally, we learned that many aircraft's that were used in World War II were held on the Flight Deck. This is important because these aircraft's are really old and they are still held on the ship. People should know this because those aircraft's could have been flown by someone you know.
The 8 Ports:
Our class just had a field trip to the Intrepid and we learned many things. We learned that the Intrepid was used in World War II. This is important because World War II was a big part in our history. People should know this because many people who didn't go on the Intrepid, wouldn't be alive right now. We also learned that the Intrepid was home to many soldiers during World War II. This is important because those soldiers helped fight freedom from other countries. People should know this because some soldiers wouldn't have a home if it wasn't for the Intrepid. Finally, we learned that many aircraft's that were used in World War II were held on the Flight Deck. This is important because these aircraft's are really old and they are still held on the ship. People should know this because those aircraft's could have been flown by someone you know.
The 8 Ports:

- Port 1: Newport News, Virginia: April 26, 1943 - The Intrepid launches after 18 months of construction
- Port 2: Pearl Harbor, Hawaii, USA: January 10, 1944 - The Intrepid arrived in Pearl Harbor and began many missions
- Port 3: Western Pacific Ocean, Philippines: November 25, 1994 - 69 men died and 35 wounded in the Kamikaze Attack.
- Port 4: Ulithi, Micronesia: March 13, 1945 - Men were allowed to explore the ports while on Liberty
- Port 5: North Atlantic Ocean: May 24, 1962 - Helicopters picked up Scott Carpenter from Mercury 7
- Port 8: North Atlantic Ocean: March 23, 1965 - Intrepid picks up John Young and Virgil Grissom
I think the Intrepid is a very memorable place and everyone should visit. It shows how the people used the ship during World War II. It's importance in our history as a country is that since many people have died and got injured from this war, it is our responsibility to respect them.
Ombre is big! Whether its on clothing or makeup. Subsequently, it has to be on nails too! Today we are going to learn about purple ombre nails.
 You will need:
- white nail polish
- Essie-Nice is Nice polish
- China Glaze-Spontaneous
- China Glaze-Coconut Kiss
- OPI-Siberian Nights
- makeup sponge
- cotton swab
- bottle cap
- nail polish remover
 First, paint a white base coat on all your nails. This will make the colors pop! Let it dry now. Next, dampen your makeup sponge and get out all the excess water. Take your polishes and paint a stripe going light to dark. (As shown in the picture)
In addition, line the sponge up against your nail and press down. It's okay if the color gets on your skin because we can clean that up later. However, be careful not to overdo it! Do this with all your nails and then start adding a second and third coat so it becomes darker. Now let it dry.
Now lets clean up all the excess polish on your skin! Pour a little bit of nail polish remover in a bottle cap. Dip your cotton swab into that and rub it on the excess polish. Be careful not to get it on your nails! You may also add a top coat if you like.
First, paint a white base coat on all your nails. This will make the colors pop! Let it dry now. Next, dampen your makeup sponge and get out all the excess water. Take your polishes and paint a stripe going light to dark. (As shown in the picture)
In addition, line the sponge up against your nail and press down. It's okay if the color gets on your skin because we can clean that up later. However, be careful not to overdo it! Do this with all your nails and then start adding a second and third coat so it becomes darker. Now let it dry.
Now lets clean up all the excess polish on your skin! Pour a little bit of nail polish remover in a bottle cap. Dip your cotton swab into that and rub it on the excess polish. Be careful not to get it on your nails! You may also add a top coat if you like.
ENJOY!
Animal Prints are big these days! Why don't you try out pink leopard print nails? They look marvelous on your nails and its very enjoyable too!
You Will Need:
- light pink polish (Pure Ice-Love works best!)
- whitish pink polish (Orly-Kiss the Bride works best!)
- hot pink polish (China Glaze-Rich and Famous works best!)
- tiny pointed paint brush
- piece of paper
First, take the light pink polish (Pure Ice) and paint a base coat on all your nails. Make sure it dries completely before you do anything else. Next, take the whitish pink polish (Orly) and make random spots on your nails with a tiny pointed paint brush. Make sure not to keep too much nail polish on the brush because then it will look like globs on your nail. In addition, dip your paint brush into the hot pink polish (China Glaze) and put a small glob of polish on the piece of paper. Take the excess polish off your paint brush.
Furthermore, take a little polish from the glob and make a semi-rounded line along the spot on your nail. Then make a another one and make sure they connect.Make one more line on the bottom and there's your one spot! Now do the same with all the spots! Once you're done and all has dried, take the same color and make random small circles just for design. After that dries, just put on a top clear coat!
ENJOY!
Welcome back! I was just thinking how spring is here and summer is going to bounce in after a few months. This is my first post on nails so we are going to start by learning how to make tie dye nails! Well, lets get started!
You will need:
- Clear top coat
- Any four colors of nail polish that look good together
- A pin or needle
- A paper towel
First, take one of your nail polish colors and color in a small circle in the middle of your nail. In addition, take another color and make a circle around the middle one. Make sure that the colors you choose to put together are able to blend. Next, take your third color and make another circle. Furthermore, choose your last color and make one last circle.
Make sure that your nails didn't dry yet because now we need to blend the colors! Take the pin or needle and make any lines to blend. You can make straight lines or even curved. After that dries, apply a top clear coat. Clean up the excess nail polish before you say you are done! Have fun with your nails and hope you liked my first nail post!
Welcome back! Its Spring Break here and some kids are home with nothing to do. You can pass your time by making swirl tie dye!
Materials
- 100% cotton white t-shirt
- Latex Gloves
- Dye
- Squirt bottles
- A bucket
- Drop Cloth
- Rubber Bands
 First, put on your latex gloves. Place the shirt on a flat surface. Pinch the fabric in the middle between your thumb and your forefingers and slowly twist the fabric in a clockwise direction until all is turned. Make the twisted fabric into a tight bundle and keep a neat spiral. In addition, secure the bundle with rubber bands. At this point, the t-shirt should look like the picture on the right.
More importantly, squirt different colors of tie dye onto the shirt and make sure it goes inside the folds too. You may need to move the rubber bands around a little bit as you go. Now, let it dry. Furthermore, slowly take out the rubber bands. In summation, rinse the shirt so the excess dye is removed. Have fun with your new t-shirt!
First, put on your latex gloves. Place the shirt on a flat surface. Pinch the fabric in the middle between your thumb and your forefingers and slowly twist the fabric in a clockwise direction until all is turned. Make the twisted fabric into a tight bundle and keep a neat spiral. In addition, secure the bundle with rubber bands. At this point, the t-shirt should look like the picture on the right.
More importantly, squirt different colors of tie dye onto the shirt and make sure it goes inside the folds too. You may need to move the rubber bands around a little bit as you go. Now, let it dry. Furthermore, slowly take out the rubber bands. In summation, rinse the shirt so the excess dye is removed. Have fun with your new t-shirt!
A kaleidoscope is a fun toy and you can always go out to the store to get one. Well, save your money by making one yourself!
Materials
- Clear, heavy plastic
- Ruler
- Pen
- Scissors
- Clear Tape
- Paper Towel Tube
- Black construction paper
- plastic wrap
- Shiny jewels, gems, or beads
- Wax paper
- Rubber Band
- Wrapping Paper
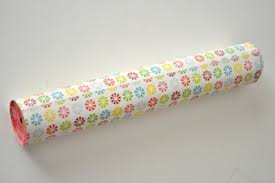
First, draw an 8x4 rectangle on the plastic with your pen. Second, draw three lines parrelel to eachother on the rectangle. Next, fold your rectangle along the lines you just drew. Make it into a 3D triangle and tape on the top. In addition, cut the paper towel tube to a length of eight inches and then slide the triangle inside the tube. Furthermore, place one end of the tube on the construction paper and trace it. After, cut that out and tape it to one end of the paper towel tube. More importantly, poke a small hole in the middle of the construction paper circle with a scissor.
Next, take plastic wrap and wrap it around the other end of the paper towel tube. Poke your finger about one inch in the middle and then fill it up with shiny jewels, gems, or beads. Then, cover that with wax paper and wrap a rubber band around it. Now, cut off the extra plastic wrap and wax paper. In summation, to decorate, wrap the outside in wrapping paper so it looks pretty. Make sure not to wrap the two ends.
Look through your kaleidoscope facing a lamp or the sun and keep turning it to see the pretty designs you have made!
HAVE FUN!!
 You will need:


