Thursday, March 21, 2013

Tulle Flowers!

Welcome Spring! Spring is finally here and the flowers will start to bloom. Lets get those flowers blooming early by making tulle flowers. This is a simple and very fun craft to do! You can put this flower anywhere and decorate anything. You can clip it on a hat or even a t-shirt!

Materials
  • tulle
  • scissors
  • needle
  • thread
First, cut four pieces of tulle, each being one inch wide and 30 inches long. Second, fold each strip two times. Next, thread a needle with thread and tie a knot at the end of one strip. (The thread should be the same color as the tulle.) In addition, take the needle and weave through the top of the tulle. When you reach the end of one strip, start with another strip. Cinch the tulle as you go to make the flower more fluffy.  When you are done, cinch all of it tightly and sew the beginning of the flower to the end and tie a knot.

Furthermore, separate the tulle pieces so it looks more fluffy and realistic. Now that you're done can add a clip on the back so you can clip it on anything to decorate. You can also hang it in your room or just leave it. Have fun and Happy Spring!


DECORATE

Friday, March 15, 2013

Shamrock Stamp

Welcome back everyone! St.Patrick's Day is just around the corner so lets get in the spirit! Today we will learn to make a shamrock stamp! You can stamp this any place you want to decorate for the special day!

Materials

  • Cardboard (4x4)
  • Foam Sheet (4x4)
  • Scratch Knife
  • Liquid Glue
  • Green Acrylic Paint
  • Paper
  • Pencil
First, take the foam sheet and glue it on the the cardboard. Let it dry for a few minutes until you start working again. Next, take your pencil and draw a shamrock on the foam sheet. To draw a shamrock, draw a heart and two other hearts coming from both the other sides. In addition, draw two lines coming from the bottom of the three hearts and connect them.

Furthermore, take the scratch knife and cut over the shamrock that you drew. Cut it so it almost looks like you drew it in bubble letters. More importantly, take green acrylic paint and paint on the shamrock. Before that dries, make a test by quickly stamping it on a piece of paper. Press it down for a few seconds and once you think it's ready, take it off. Now you should be able to see the shamrock!
                                         Have fun!


Saturday, March 2, 2013

It's Time For One to Die!


The Argument
For many years, people have been arguing about whether or not crayons are better or colored pencils. What do you think is better? Well, let's find out?
Crayons
Crayons have many pros but also have many cons. Crayons last longer because all you have to do is pull the wrapper off instead of sharpening it. Crayons could also be very waxy and don't show smooth marks on the paper. Crayons are also better for little children to use because crayons lead children to self expression, teach them the colors, and also they really amaze the minds of young children. Although the crayons are better for young children, they can also be bad for young children. Research shows that crayons amaze the minds of young children so much that it looks like food. As CRAZY as it sounds, many times in the past, children have actually ate crayons!


Colored Pencils
Colored Pencils are also great to color. Colored pencils are known to be soft-tipped which make you color faster. Although you can color faster, you always have to sharpen the pencil when the point breaks which makes the process slower. Colored pencils are also known for children and adults. Crayons are known for young children. Colored pencils are also great for small details but research shows that if you use colored pencils for a long time, the joints in your fingers can ache and pain. 

Crayons
pro
1. last longer
2. lead children to self expression
3. teaches children colors
4. amaze childrens' minds
 
con
1. children could eat crayons
2. very waxy
 
 
Colored Pencils
pro
1. soft-tipped
2. color fast
3. great for small details
 
con
1. constently sharpen
2. aching fingers


Friday, February 22, 2013

Cupcake Liner Flower!

Spring is just around the corner and the flowers will bloom with rain filling the air. Well, lets get the flowers blooming early by making Cupcake Liner Flowers! It is a beautiful looking craft and a great decoration to keep in your house.

Materials
  • Cupcake Liners
  • Washi Tape (printed masking tape)
  • Pipe Cleaners
  • Light-Gauged Wire
  • Glue
  • Scissors
  • Buttons
First, fold the cupcake liners in half. Next, wrap the cupcake liner loosely around a pipe cleaner. With the washi tape, tape around the bottom of the flower and keeping wrapping until the whole pipe cleaner is covered. For the leaves, sandwich a 5 inch piece of light-gauged wire between two cupcake liners that are flattened. In addition, glue it on but leave 2 inches of wire left.

 More importantly, take the wire that was left and wrap it around the pipe cleaner and tape it if you like. Next, glue a button in the middle of the flower. Now, take 5-10 cupcake liners and wrap all around a stem. When you are done, it should look a flower with many petals! Have fun and decorate!
Cupcake Liner Crafts

Friday, February 15, 2013

How to Draw a Peacock

Today we are going to learn how to draw a beautiful and colorful peacock. It is easy to draw and all you need is a paper, pencil, and an eraser.

how to draw a peacock bird step 1

First, draw two big semi-circles under each other. Next, draw a small circle in the middle for the head and then a line going down for the neck. Third, draw a body shape from the neck and two lines for the legs. Also, make two lines coming out from the bottom of the body.


how to draw a peacock bird step 2

In addition, draw oval like shapes for the tail feathers and a fluffy cloud like shape in the middle of the body.


how to draw a peacock bird step 3
You are half way done! Now, add larger feathers to the feathers you already have, an eye and a beak. After, add three curls on top of the head.


how to draw a peacock bird step 4

Furthermore, add another set of feathers that are larger than the others. Then, add another cloud like shape under the other.


how to draw a peacock bird step 5
More crucially, draw the "eye" feathers on the peacocks' feathers. To do that you have to draw straight lines from behind the peacock and a tear drop shape. Inside, draw the eye.

Finally, erase all the unneeded lines and color! Have fun coloring!
how to draw a peacock bird step 6

Thursday, February 7, 2013

Pom Pom Flower Balls

Hey guys! I'm back! Today we are going to learn how to make Pom Pom Flower Balls! This is a fun and exciting craft to make and great to hang in your bedroom! Let's get started!

Materials
  • Five pieces of tissue paper (same or different colors)
  • Scissors
  • Curling ribbon
First of all, line up all the tissue paper so it is in a pile. Next, fold all the tissue papers in half. In addition, cut on the crease so you will have ten pieces of tissue paper. Once again, lay the ten pieces of tissue paper so they are aligned. Furthermore, fold the tissue paper all the way so it is like an accordion. Basically, you fold the top an inch down and then turn it over. Next, you do the same thing to this side and you keep doing it until you have to more tissue paper left to fold. After you have done that, trim the ends so it is in a shape of a triangle. Now, fold it in half so you can find the middle point.

More importantly, cut a small piece of curling ribbon and tie it in the middle point really tight so it wont come off. In addition, fan the two sides out and then take each tissue paper and fluff it out by pulling each piece up or down. In the end, you will have a Pom Pom Flower Ball!

HAVE FUN!

Friday, February 1, 2013

Heart Mobile!

Hey guys! Valentines day is around the corner so we are going to make a Heart Mobile! This is great to hang down from your ceiling and is a great February craft! Although you can make this with any shape, I am going to teach you with hearts!

Materials
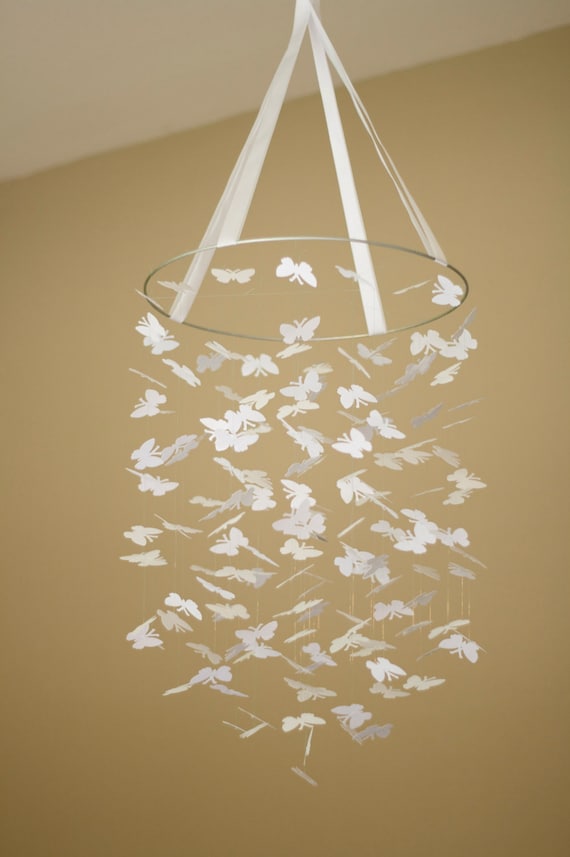
    White Bright Butterfly Mobile KIT-DIY-Great Craft Project
  • Large hoop
  • String
  • Red or pink construction paper
  • Ribbon
  • Scissor
  • Glue gun
Now we are ready to start! First, cut out four pieces of ribbon. Each should be about a foot long. Next, find the middle of one string and place the middle on the hoop so it wraps around. Do this with each ribbon and tie all of them together on the top just like the picture. In addition, take the construction paper and cut about 100 small hearts. After, cut out different sizes of string and make them long enough so you can hang them up on the mobile. Cut about 50 strings Furthermore, take the glue gun and glue the small hearts to different parts of the string. Hang them up and down so it is filled with hearts!

More importanly, let it dry and then glue the top of each string to the hoop with the hot glue gun. Let it dry again. This project takes about three hours. The longest step is when you need to cut out about 100 hearts. The part where you cut the string is long as well. GOOD LUCK AND HAVE FUN! :o)