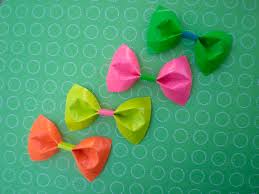
Duct Tape Bows!
There are tons of things you can make in art! There are fun crafts and many things to paint! One of my favorites are making things with duct tape! Today we are learning to make duct tape bows! All you need is a few materials:
- Two different designs of duct tape
- A scissor
Now we are ready to start! First, you need to pick which duct tape you want to use to make the bow. You have to cut about 18 inches of duct tape. After you have done that, you have to hold it straight and fold it so the sticky side touches the other but leave a one inch sticky side out. In addition you have to fold it again so the sticky part can stick both of the folded sides together. It should look almost like a cuff. We are almost done! We have to make the shape of the bow by folding it like a hot dog and then pinching the middle together. Make sure to keep your hand in the middle of the bow. You will now be able to see the shape of the bow.
Next, you have to pick up your other design of duct tape and cut one centimeter of it. You are using this to wrap it around in the middle so that the bow stays keep. Now your bow is done! Duct tape bows are very simple. It's a really fun craft for girls! Here are some things you can do you bows. Put it in your hair, tape it on a pen, folder, binder, etc. Stick to me to find how to make more duct tape crafts! Here is one really good tutorial! Have fun!
https://www.youtube.com/watch?feature=player_detailpage&v=NFOwtZSVqo0
Those are really nice! have you tried them before?
ReplyDeleteThanks! I have made many of them before! What about you?
Delete